
Hello again,
I came across this article at MuddyFingernail, one of many sites we follow at www.twitter.com/skillins. MuddyFingernail is often a great place to find easy to read and follow articles about gardening. This one fits the bill and is called Easy Steps to Building a Vegetable Garden. The writer is Natasha Gibson. I have included a few comments in italics.
Thankfully Spring is finally upon us, and what better way is there to celebrate then creating your very own veggie garden! I took to this task this past weekend and figured I would post some of the useful tips I found when conducting my own research.
1. Go to your local gardening centre to pick up supplies, here's a list of what you need to get started:
- seeds
- top soil
- a good fertilizer- we recommend Garden Tone by Espoma or Plant Booster Plus by Organica
- a trellis (if your growing peas, or pickling cukes or beans in a few weeks)
- gardening gloves
- a shovel- if you don't already have one
2. Once you have all your gear your going to want to pick a space in your yard that gets lots of sunshine, mark off a section no more than 8X10 feet for beginners. If the spot is part of your lawn your going to want to dig up your grass to uncover the dirt underneath. Its a good idea if you can manage building a raised border out of wood to box in your garden.
3. Next you're going to mix your fertilizer and top soil then pour it on top of the dirt that you dug up.
4. You're going to want to plant your veggies according to the package directions, planting cool weather veggies first such as lettuce, spinach and peas. Once the ground temperature warms you can start about adding more veggies (again they vary so look to your package)--also consult us at Skillin's. Warmer weather crops like tomatoes, peppers, and vine crops are planted close to the end of May or first part of June.
5. You will want to create labels for the veggies so you know what is where, the easiest way to do this is by taking the actual seed packages (when you open them be careful to just cut off a tiny sliver from the top so you don't wreck the picture) Then poke to a tiny whole at the top and bottom of the package to slide the stake through, and voila you have a cute rustic label
6. You may want to consider getting some wired garden fencing to keep cats and other wild life out, to keep slugs out you can use copper wiring to border your garden as a natural pesticide.
Most seeds take 8-10 weeks to yield their first crop, but you can continue adding to your garden every 2 weeks so that you maintain a continuous supply of fresh produce.
Mike Skillin
Skillin's Greenhouses
March 31, 2010
Wednesday, March 31, 2010
Tuesday, March 30, 2010
Fertilizer: What is in the Bag?
What do the letters and numbers mean on a fertilizer bag? Why is it important? These and many more questions are asked of us all the time. Let KCB explain it:
Fertilizer: with an NPK of 5-3-4
What do the letters mean?
1st letter = N for Nitrogen
2nd letter = P for Phosphorus
3rd letter = K for Potassium
What do the numbers mean?
The % by weight of the element in the mixture. A 10 pound bag of fertilizer labeled 5-10-5, it would contain 5% nitrogen, 10% phosphorus and 5% potassium. The remaining 80% could be comprised of other nutrients and filler.
What do these elements do?
Nitrogen: Aids in the above-ground leafy green growth. Enhances foliage.
Phosphorus: Supports root development, fruit & flowering. Also helps in the transfer of energy from one part of the plant to another. Fertilizers that promote bigger and more blooms will have a higher % than the other ingredients.
Potassium: Helps a plant fight disease and regulates the synthesis of proteins & starches
Extra Tip: Magnesium works especially well with potassium and should also be included in the fertilizer mix. It helps to maintain balance between the green foliage and the flower.
What else is in there?
Other nutrients like calcium, magnesium, iron, and micronutrients
Types of fertilizers
Complete Fertilizers: Fertilizers that contain all three major nutrients are considered complete fertilizers. There are specialized fertilizers which are called incomplete because they lack one or more major nutrients such as a fertilizer labeled 0-20-20.
Granular – This is the most common bagged fertilizer product. It is best applied with a spreader and is long lasting. This is the version you’ll find in time release and can last in the soil up 6-9 months.
Water Soluble – This type of fertilizer is designed to dissolve in water and is more readily absorbable to your flowers and plants. This version only last in the soil 1-2 weeks however and need to be re-applied often to be as effective as granular fertilizers.
Natural Organic – This consists mostly of manures and bone meal. Yes they are natural, but they are lower in nutrient levels than synthetic versions mentioned Organic fertilizers made from natural ingredients often have lower concentrations of the three major nutrients, so you will need to use larger amounts. However, they do contain many other nutrients that feed both the plant and the soil. If you are using a synthetic fertilizer, you should supplement with some type of organic matter such as compost or manure, to maintain soil health.
KCB for Skillin's Greenhouses
March 30, 2010
Gardening 101
Hello again,
Skillin's is holding a Gardening 101 class this Saturday at 10 AM and 2 PM at the Brunswick, Cumberland and Falmouth locations. Drop us a note at skillins@maine.rr.com if you would like to register for the class! What follows is KCB's outline for the class:
Whether a seasoned gardener, just beginning or somewhere in between, it is best to have a strategy before you begin. With some forethought it could save money and pain, both physical and emotional, down the road.
1. Plan before you plant
2. Prepare before you plant
3. What you need
4. What plants need
5. Right Plant, Right Place
PLAN BEFORE YOU PLANT
1. THINK about how you wish to use your out-of-doors space:
Recreation
Relaxing & Reflecting
Dining& Entertaining
Theme Gardens
o Bird & Butterfly Magnet
o Culinary
o Mixed Border
o Moon
All of the above
o Separate areas creating ‘rooms’
2. IMAGINE the garden beds and landscape you want to create
Plants
Colors
Visualize a palette that you find attractive and not specific plants.
Foliage!!!
Textures
Foliage
Lacy
Succulent
Spiky
Broadleaf
3. BUDGET
For Materials & Maintenance
4. MAINTENANCE
Initial installation and on going
Low Maintenance doesn’t mean NO maintenance
PREPARE BEFORE YOU PLANT
1 Know your property
Walk you property
o Check
Topography
Wind intensity
Drainage
Water Source
Micro-climates
Sunlight
• Time of day and duration
Wildlife
Known Pests
2. Know your soil
o TEST SOIL
pH = soil acidity or alkalinity
• 7 is Neutral
o < = Acid (“sour”)
Add lime to decrease (increase pH)
Wood Ash
o > = Alkaline (“sweet”)
Add aluminum sulfate (decrease pH)
Sulfur
Levels of Nutrients (only 3 are listed
• Nitrogen (N) 1st # on plant food/fertilizer bag
o promotes foliage over-all growth in lushness and color
• Phosphorus (P) 2nd # on plant food/fertilizer
o Promotes flowering (blooms) & Fruit development
o Promotes strong roots
• Potassium (K) 3rd #
o Promotes over-all health, strength and size of plant
3. Know your self
a. “Warming up before gardening is just as important as warming up before a vigorous workout. After warming up, stretching exercises for the major muscle groups that will be involved in performing the task can reduce the risk of injury.” The American Society of Hand Therapists ASHT®
b. Your schedule; how much time you really want to commit to your garden.
WHAT YOU NEED!
APPROPRIATE TOOLS-sharpened and in good working order.
1. Tools for digging and/or planting
Trowel
Spade
Digging/Pitch Fork
2. Tools for Pruning/Cutting
Hand pruners
Loppers
Saws
• pruning
• bow
3. Tools for Weeding
Garden Hoe
hand fork
Dandelion weeder
4. Tools for hauling
Wheelbarrow
Bucket
5. Tools for watering
Watering Can
Hose
6. Tools for comfort and Safety
Gloves
Mud gloves
Light weight/flexible
Rose (long, up to elbow made of leather)
Knee Pads
Safety Glasses
Sun Screen
Hat
WHAT PLANTS NEED
Good Soil
Sunlight
Degrees of light
• Full Sun = 6 hours of sun between 10 AM 6 PM
• Part Shade/Part Sun = less than above or sun earlier in day
• Filtered Shade/Sun = Under trees or structures in full sun
Water
• Achieve Balance
• Slow deep watering
• Do not waste
A Good Start
• See Plan & Prepare!
RIGHT PLANT/RIGHT PLACE
Things to consider
Amount of Sunlight
Growth pattern/height
o Will plant spread
o Will self sow
o Height
Maintenance needs
o Deadheading
o Dividing
Watering needs
MAKE A LIST BEFORE YOU HEAD TO THE NURSERY
Select plants appropriate for your property
Sunlight, soil, maintenance needs, height and spread
Read plant labels/tags
Ask professional nursery staff
Keep a Garden Journal!
Make notes of what and when of blooming, what works, what needs dividing, any special notations.
For Soil Test Kits, various publications or to learn more about the Master Gardener program:
Cumberland County Extension Office
15 Chamberlain Ave.
Phone: (207) 780-4205 or
800-287-1471 (in Maine)
FAX: (207) 780-4382
E-mail: cecmb@extension.umaine.edu
Office hours: weekdays from 8:00 a.m. to 4:30 p.m.
Favored Web Sites:
Skillins.com
Finishingtouchesgardendesign.com (under construction-check back soon)
http://extensionpubs.umext.maine.edu/
Monday, March 29, 2010
New Nursery Plants for Skillin's 2010, Part 1!
Hello again,
Tim Bate our Nursery Buyer and Manager has compiled what I think is a rather exciting list of new nursery shrubs and trees for 2010. We are breaking it into parts and will bring you the separate parts over the next few days.
A designation of "#2" means a 2 gallon pot; #3 is a 3 gallon pot and so forth. And now from Tim Bate:
New Kiwi varieties:
Pasha (Actinidia kolomitka ‘Pasha’) Z4
A stunning, decorative vine for fence, trellis, or wall. This male variety of the arctic Kiwi
pollinates September Sun Arctic Kiwi, and in addition, puts on quite a show of green, pink and white foliage in late spring, early summer. The coloration becomes stronger as the plant matures and when soil is not overly fertile. Plant in full sun. #2 – 34.99
September Sun (Actinidia kolomitka ‘September Sun’) Z4
Yes, you can grow delicious kiwi fruit in Maine! This Arctic Kiwi vine produces tasty, smooth-skinned, grape-sized fruits. Yum! Plant in full sun with the male variety, Pasha, as the pollinator. #2 – 34.99
New Azalea:
Pink Mist (Rhod x viscosum ‘Pink Mist’) Z4
5-6’ tall. This New England native is a pink form of our exceptionally fragrant and popular swamp azalea. Blooms in early summer.
#2 – 34.99
New Weeping Birch:
Summer Cascade (Betula nigra ‘Summer Cascade’) Z3
A lovely, vigorous weeping tree, perfect for adding a graceful touch to the garden year-round. Sensational shaggy bark, and a rugged constitution, make this adaptable tree an easy choice for any garden situation, wet or dry.
#15 - 185.00
2 recent Butterfly bush intros:
Blue Chip (Buddleia x ‘Blue Chip’) Z5

24-30” Tall. Finally, a selection that leaves room in the butterfly garden for other plants. This tidy variety from the new Lo & Behold series is covered with lavender blooms and loves sun.
#2 - 26.99
Miss Ruby (B. ‘White Ball’ x B. ‘Attraction’) Z5
6’ tall and wide. Provides some the brightest reddish-pink flowers found on a butterfly bush. A visitors’ favorite at the UK’s Wisley Garden’s 2008 garden trials.
#3 - 29.99

2 Sweetshrubs to love:
Venus ( Calycanthus x ‘Venus’) Z5
5 Tall and wide. This outstanding new hybrid sweetshrub offers up magnolia-like white blossoms that perfume the air with scents of strawberry and melon in late spring. Flowering continues sporadically throughout the summer until the large glossy foliage turns brilliant yellow in the fall.
#3 - 34.99
Hartlage Wine (X sinocalycanthus raulstonii ‘Hartlage Wine’) Z5
6-9’ tall. This outstanding, and much sought after hybrid, offers the most beautiful, lightly scented, raspberry to wine-red colored flowers. Fall foliage color is an outstanding yellow. Flowers best in sun to part sun locations and favors rich, well drained soils.
#2 – 44.00
Cool Native:
Buttonbush (Cephalanthus) Z4
Sputnik (Cephalanthus occidentalis ‘Sputnik’) Z5(4?)
6’ Tall and wide. A must have magnet for the butterfly garden! Tiny tubular flowers are clustered into 1.5” spherical arrays that get the word out to the butterfly world: “Plenty of nectar here!” This plant also thrives in wet situations, and in much of the eastern U.S. the wild form can be found growing along the edges of ponds and lakes.
#2 – 29.99
 (Cephalanthus Sputnik)
New Clethra:
Vanilla Spice (Clethra aln. ‘Caleb’) Z4
3-6’ Tall and wide. A compact grower that provides a long season of bloom and fabulous fragrance near the end of summer. This blossoming beauty is a major butterfly attractor and grows well in almost any garden situation, but especially thrives in moist, part sun locations.
#2 - 32.99

Golden Glory ( C. mas ‘Golden Glory’) Z4
20’ Tall. Also known as Cornellian Cherry Dogwood, this upright growing shrub or tree is a prolific bloomer, and brings welcoming, cheerful yellow, long-lasting flowers to the spring garden. Fruit is a glossy cherry-red and used for syrup and preserves.
#10 – 135.00
It is a Hydrangea World!
Incrediball (H. arborescens ‘Abetwo’) Z3
4-5’ tall. This is an improved Annabelle-type Hydrangea. The goal was to get sturdier stems so the plant wouldn’t flop over after rain, and the result was just that, with the bonus of each bloom having 4 times as many flowers. As they say, “Incrediball”! Thrives in moist soil in part sun, but adaptable to many sites. Can be cut to the ground in spring without diminishing summer flowering.
#2 – 34.99
#3 – 42.00

Invincibelle Spirit (H. arborescens ‘NCHA1’) Z3
3-4’ tall and wide. The most exciting new plant for Maine gardens in years! The white form of hydrangea arborescens, ‘Annabelle’, has been a popular garden staple for years, and finally, after years of work, plant breeders have brought us the gift of this sensational new pink variety. It is super hardy, with extremely prolific blooms that are produced from July right up until frost. And it can be cut to the ground in spring without diminishing the flower show. On top of all that, Proven Winners is supporting a campaign to raise 1 million dollars for breast cancer research, and will donate $1 for every Invincibelle Spirit Hydrangea purchased to the nonprofit Breast Cancer Research Foundation. There are so many great reasons to make room for this plant in your garden, or share it with a friend.
#3 – 44.00

Vanilla Strawberry (H. paniculata ‘Renhy’) Z4
6-7’ tall and 4-5’ wide. Imagine a bowl filled with vanilla ice cream topped with strawberry sauce. This tempting hydrangea is a treat for the eyes. Blossoms begin a creamy white in summer, change pink and finally end with a delicious display of strawberry red for the fall garden. You may want seconds, and we won’t stand in the way!
#2 – 34.99

More new plants soon here at the Skillin's Garden Log! And come see these plants for yourself soon at our nurseries. By mid April we should be very well stocked in most of these plants!
Tim Bate
Skillin's Greenhouses
March 29. 2010
Tim Bate our Nursery Buyer and Manager has compiled what I think is a rather exciting list of new nursery shrubs and trees for 2010. We are breaking it into parts and will bring you the separate parts over the next few days.
A designation of "#2" means a 2 gallon pot; #3 is a 3 gallon pot and so forth. And now from Tim Bate:
New Kiwi varieties:
Pasha (Actinidia kolomitka ‘Pasha’) Z4
A stunning, decorative vine for fence, trellis, or wall. This male variety of the arctic Kiwi
pollinates September Sun Arctic Kiwi, and in addition, puts on quite a show of green, pink and white foliage in late spring, early summer. The coloration becomes stronger as the plant matures and when soil is not overly fertile. Plant in full sun. #2 – 34.99
September Sun (Actinidia kolomitka ‘September Sun’) Z4
Yes, you can grow delicious kiwi fruit in Maine! This Arctic Kiwi vine produces tasty, smooth-skinned, grape-sized fruits. Yum! Plant in full sun with the male variety, Pasha, as the pollinator. #2 – 34.99
New Azalea:
Pink Mist (Rhod x viscosum ‘Pink Mist’) Z4
5-6’ tall. This New England native is a pink form of our exceptionally fragrant and popular swamp azalea. Blooms in early summer.
#2 – 34.99
New Weeping Birch:
Summer Cascade (Betula nigra ‘Summer Cascade’) Z3
A lovely, vigorous weeping tree, perfect for adding a graceful touch to the garden year-round. Sensational shaggy bark, and a rugged constitution, make this adaptable tree an easy choice for any garden situation, wet or dry.
#15 - 185.00
2 recent Butterfly bush intros:
Blue Chip (Buddleia x ‘Blue Chip’) Z5

Buddleia Blue Chip
24-30” Tall. Finally, a selection that leaves room in the butterfly garden for other plants. This tidy variety from the new Lo & Behold series is covered with lavender blooms and loves sun.
#2 - 26.99
Miss Ruby (B. ‘White Ball’ x B. ‘Attraction’) Z5
6’ tall and wide. Provides some the brightest reddish-pink flowers found on a butterfly bush. A visitors’ favorite at the UK’s Wisley Garden’s 2008 garden trials.
#3 - 29.99

(Buddleia Miss Ruby)
2 Sweetshrubs to love:
Venus ( Calycanthus x ‘Venus’) Z5
5 Tall and wide. This outstanding new hybrid sweetshrub offers up magnolia-like white blossoms that perfume the air with scents of strawberry and melon in late spring. Flowering continues sporadically throughout the summer until the large glossy foliage turns brilliant yellow in the fall.
#3 - 34.99
Hartlage Wine (X sinocalycanthus raulstonii ‘Hartlage Wine’) Z5
6-9’ tall. This outstanding, and much sought after hybrid, offers the most beautiful, lightly scented, raspberry to wine-red colored flowers. Fall foliage color is an outstanding yellow. Flowers best in sun to part sun locations and favors rich, well drained soils.
#2 – 44.00
Cool Native:
Buttonbush (Cephalanthus) Z4
Sputnik (Cephalanthus occidentalis ‘Sputnik’) Z5(4?)
6’ Tall and wide. A must have magnet for the butterfly garden! Tiny tubular flowers are clustered into 1.5” spherical arrays that get the word out to the butterfly world: “Plenty of nectar here!” This plant also thrives in wet situations, and in much of the eastern U.S. the wild form can be found growing along the edges of ponds and lakes.
#2 – 29.99

New Clethra:
Vanilla Spice (Clethra aln. ‘Caleb’) Z4
3-6’ Tall and wide. A compact grower that provides a long season of bloom and fabulous fragrance near the end of summer. This blossoming beauty is a major butterfly attractor and grows well in almost any garden situation, but especially thrives in moist, part sun locations.
#2 - 32.99

(Clethra Vanilla Spice)
Terrific tree:
Golden Glory ( C. mas ‘Golden Glory’) Z4
20’ Tall. Also known as Cornellian Cherry Dogwood, this upright growing shrub or tree is a prolific bloomer, and brings welcoming, cheerful yellow, long-lasting flowers to the spring garden. Fruit is a glossy cherry-red and used for syrup and preserves.
#10 – 135.00
It is a Hydrangea World!
Incrediball (H. arborescens ‘Abetwo’) Z3
4-5’ tall. This is an improved Annabelle-type Hydrangea. The goal was to get sturdier stems so the plant wouldn’t flop over after rain, and the result was just that, with the bonus of each bloom having 4 times as many flowers. As they say, “Incrediball”! Thrives in moist soil in part sun, but adaptable to many sites. Can be cut to the ground in spring without diminishing summer flowering.
#2 – 34.99
#3 – 42.00

(Hydrangea Incrediball!)
Invincibelle Spirit (H. arborescens ‘NCHA1’) Z3
3-4’ tall and wide. The most exciting new plant for Maine gardens in years! The white form of hydrangea arborescens, ‘Annabelle’, has been a popular garden staple for years, and finally, after years of work, plant breeders have brought us the gift of this sensational new pink variety. It is super hardy, with extremely prolific blooms that are produced from July right up until frost. And it can be cut to the ground in spring without diminishing the flower show. On top of all that, Proven Winners is supporting a campaign to raise 1 million dollars for breast cancer research, and will donate $1 for every Invincibelle Spirit Hydrangea purchased to the nonprofit Breast Cancer Research Foundation. There are so many great reasons to make room for this plant in your garden, or share it with a friend.
#3 – 44.00

(Hydrangea Invencibelle Spirit!)
6-7’ tall and 4-5’ wide. Imagine a bowl filled with vanilla ice cream topped with strawberry sauce. This tempting hydrangea is a treat for the eyes. Blossoms begin a creamy white in summer, change pink and finally end with a delicious display of strawberry red for the fall garden. You may want seconds, and we won’t stand in the way!
#2 – 34.99

(Hydrangea Vanilla Strawberry!
More new plants soon here at the Skillin's Garden Log! And come see these plants for yourself soon at our nurseries. By mid April we should be very well stocked in most of these plants!
Tim Bate
Skillin's Greenhouses
March 29. 2010
Sunday, March 28, 2010
The Sky is the Limit
KCB is a professional gardener and friend who does wonderful work in the Greater Portland area. KCB is also an accredited Master Gardener by the Cooperative Extension Service and we are honored to have KCB as part of our Skillin's Garden Log family. KCB can also be found at the awesome Finishing Touches website.
There are a lot of things I cannot do; some things I refuse to do and others I could never imagine doing. Allow me to address something that falls within the latter category.
Roofing. I am watching 4 men walking around scaffolding and climbing over gables and dormers as if they are merely taking a stroll around the block. One or 2 are sporting harnesses as they ascend the summit. These workers are bundled with several layers of clothing, a far cry from the shorts and shirtlessness of a week ago.
As a 3rd floor dweller I am nearly eye to eye with this crew. I could wave but do not dare as I vicariously am experiencing vertigo. My stomach is queasy at the thought of climbing a step ladder never mind making my way up one that extends to the sky. One of the crew is straddling the peak as easily as mounting a Morgan Horse. Granted, with crystal clear skies the view must be spectacular. He is facing Casco Bay but the better view is to his back. No, not me but Mt Washington. As if willed by me, he turns. I am dizzy just watching yet I cannot look away. Not even to type. I have a fear that my fingers have moved from the home keys with only random letters floating on the page in place of my random thoughts.
No, I could not do that job. My mind spends enough time in the stratosphere yet I want to keep my feet planted on the ground.
Acrophobia aside, I am glad I am not a roofer. During the dog days of summer the show must go on. Earlier today I asked a terra planted crew mate which was worse, 90 or 20 degrees. The answer ‘you can only take off so much clothing…’ As a gardener and someone who spent time in the south I agree. My new friend seemed to really like his job, at least today. I too like what I do. Could there be other kindred elements between a gardener who toils in the dirt and a roofer who kisses the sky? Weather is always a safe subject so we started a conversation. As a rule they do not work in the rain. Rain doesn’t stop me. We continued and found another common denominator; lightning being one of the few deal breakers. With the first clap of thunder I cease and desist. Ok, not actually true, I count to see how close it is. Still it wouldn’t be fun to be digging in the dirt with anything metal as I kneel upon the wet earth. With lightning in the forecast a roofer may not even want to venture out were clearly metal, water and electricity do not mix.
Always inquisitive I asked how he prepares for the season. I revealed my yearly promise to ready my body for the gardening season. Now it was his turn to relate. Installing a new roof does put to task muscles not normally used during other home improvement projects. Climbing, stretching and twists and turns often translate to soreness at the end of the day.
Seems we have more in common with our roofing friends than just weather preferences. Can’t you relate? Gardeners often try to contort our bodies to do our bidding. We may not climb ladders or balance on scaffolding but twist, turn and stretch we do.
I enjoyed our talk but we both had work to do...
That was several hours ago.
It appears my roofing neighbors must be winding down for the day. Braces and harnesses are removed, roping coiled and the clank of steadying ladders is detected. One is sporting a spray bottle filled with blue liquid to wash the new skylights, another takes a push broom and uses it to sweep the roof. It is fun to watch as he stretches and pulls the broom towards him. I am impressed by the attention to detail. It is the finishing touches that often make the difference.
Keep this in mind when doing your gardening this season.
Add a touch of whimsical art or other décor, sweep dirt or weed fragments from the walkway, add a clean edge to your beds, disguise the hose in a round container or behind a shrub or other object. Accentuate large faux terracotta rain barrel by incorporating terracotta containers among the bed or patio. It may be too soon to put these practices in place but it never is too soon to plan. And plan you must.
Gardeners may keep their feet and, more often than not their knees; firmly on the ground. Yet we never give up wanting to achieve new heights. Perhaps we have a little bit of the ‘roofer’ in us all.
As we dream of color galore add stretching as a chore. I have taken the liberty of recycling some information I shared a couple a seasons ago.
Get ready set go….
ASHT® recommends following warm-up exercises:
(Note: These exercises should never be painful. You should only feel a gentle stretch. Should you experience pain, please consult your primary care provider.)
Fold your hands together and turn your palms away from your body as you extend your arms forward. You should feel a stretch all the way from your shoulders to your fingers. Hold for 10 seconds and repeat 8 times.
Fold your hands together and turn your palms away from your body, but this time extend your arms overhead. You should feel the stretch in your upper torso and shoulders to hand. Hold for 10 seconds and repeat 8 times.
This is a stretch for the upper back and shoulder. Place your hand just above the back of the elbow and gently push your elbow across your chest toward the opposite shoulder. Hold for 10 seconds and repeat eight times for each arm.
This stretch benefits the triceps. Raise one arm overhead. Bend the elbow. Place the opposite hand on the bent elbow and gently push the elbow back and forth for 10 seconds. Repeat 8 times for each arm.
To stretch forearm and wrist muscles. Extend an arm in front of you; making sure the elbow is completely straight. With your palm down, take the opposite hand and bend the wrist downward, hold for 10 seconds. Then turn the palm up and stretch the wrist backwards, hold for 10 seconds. Repeat 8 times for each arm.
Another suggestion offered by the ASHT® surprised me; ‘work with well sharpened tools as well as tools designed for the task’. It does make sense. Too dull a tool, say pruners, may not only damage the plant you are pruning but will result in too tight a grip to achieve the desired result. Another big ‘no’, is trying to prune a 4 inch limb with pruners more suitable for a 2 inch branch. Been there, done that. If it is taking you 2 hands to do the job meant for one, time to switch tools.
KCB for Skillin's Greenhouses
March 28, 2010
Saturday, March 27, 2010
How to Grown Onions
Good gardening friend Paul Parent of the Paul Parent Garden Club (http://www.paulparent.com/) sends out a great newsletter every week with pertinent gardening topics. I encourage you to go to his website to sign up for his newsletter. Paul can also be heard every Sunday morning from 6 AM to 10 AM at his website or at WBACH (104.7 FM) every Sunday morning from 6 AM to 9 AM. Paul recently sent this article out called How to Grow Onions (I have added a few comments in italics) and here it is:
"Onions are among the easiest vegetables to grow in your garden. Onions are one of the most useful vegetables you have in your kitchen and if you grow them yourself, you will not believe the flavor difference compared to supermarket onions. Your kitchen would not be complete without onions to flavor most everything you cook. This vegetable can be used in your salads, soups, stews, stuffing, sandwiches, and side dishes, and even eaten raw or cooked on your hamburger. The onion originated in Asia and was grown in all parts of the world by the Egyptians, Greeks, Romans and today you in your kitchen.

The onion comes in yellow, white and red. The shape will vary from round, oval, long, thin and will grow as a single bulb or come in clusters; some even grow out of the ground.
Select a spot in your garden that has sun all day long. Your soil should be rich in organic matter, so add plenty of compost or animal manure before planting every year. A soil that is loose and well drained without clay will grow the best plants. Never plant onions in the same place every year. Rotating crops in your garden will keep them healthier, especially if you keep onions away from same area for 3 years or more. Soil pH should be between 6 and 7.5. If soil is acidic, add lime. If you have a wood stove, sprinkle the wood ash on the ground before you till the soil to plant your onions.Onions have a terrible root system and have a tough time finding food far away from the plant. The same goes for moisture in the soil; it must be there, but not in large quantities. Water onions weekly, and keep the soil moist to a depth of 6 inches. If you use a fertilizer with Mycorrhizal fungi added to it, your plants will be able to grow a root system double the normal size and that means "BIGGER" and "BETTER" onions. Use all natural Garden Tone by Espoma or Plant Booster Plus by Organica. Use at the time of planting in early May and repeat 2 times more 4 weeks apart. A couple application of all natural Fish and Seawood Food by Neptune's Harvest will also help to push the onion plant to grow faster and larger.
I will catch "Hell" for this statement, but the best onion plants come from seedlings, not "BULBS". (We sell onions grow from seeds here at Skillin's and they grow HUGE!) Onion Sets are small onion bulbs grown in Holland and shipped to the Garden Center in a dormant state. These small onion bulbs are grown in a different climate and usually produce smaller onions in your garden because of climate change. I will guarantee you bigger onions, leeks, bunching onions, etc., when you plant seedlings. Some garden centers sell seedlings in flats or trays, or you can buy them in bunches of 100 plants out of the soil. If you choose bunches, prune roots by 1/4 inch and let them set in water for a hour or two before planting.
Plant onions 6 inches apart, and they will do best in wide rows of 6 to 10 plants in a row, rather than a single plant to a row. Weeds have always been a problem during the summer and if you are not careful, you will pull up the young seedlings with the weeds. This year look for a new product called "Weed Guard Plus" planting paper. Just roll it out on the soil and water it down. Now take a screwdriver and punch a hole in the paper to insert the seedling. Set the seedlings in the soil shallow and pinch the paper to move the soil around the plant. Once all your seedlings are planted, throw a little soil on the edges of the paper to help hold it down and water the paper down again. Once the paper gets wet it will stick to the soil and keep out ALL WEEDS. When your crop is ready to harvest, the paper will have already begun to decay into the soil. When the top of the onions begin to fall over, they are ready to harvest. Just pull them out of the ground and let them sit in the sun for a few days, or until the tops turn brown and dry up. Or you can also leave the onions in the garden until the top is brown and dried up. Store onions in your basement for the winter where it is cool but where they will not freeze. Enjoy."
Friday, March 26, 2010
Cold Alert!
Hello again!
Projected temperatures 5 to 15 degrees Friday night, 20 to 25 degrees Saturday night in Skillin's Country
I have held off from writing because I do not want to be an inbox pest but understandably many folks are calling and are concerned about their outdoor plants. Really, the only concern should be for any early annuals (pansies) and any other garden crops or shrubs that have been recently planted that have tender buds or leaves. (We know that some fully forced out shrubs and other plants are coming out of the Box Stores!) These should be covered with a sheet or blanket or brought inside. We have not been recommending making such plantings yet--it is still a little early!
YOU DO NOT need to worry about your bulb plantings, existing trees and shrubs or perennials!
Our store locations and contact information are as follows:
Skillin's Greenhouses, Brunswick, 422 Bath Road, Brunswick ME 04011 442-8111, 800-339-8111
Skillin's Greenhouses, Cumberland, 201 Gray Road, Cumberland ME 04021 829-5619, 800-348-8498
Skillin's Greenhouses, Falmouth, 89 Foreside Road, Falmouth ME 04105 781-3860, 800-244-3860
also skillins@maine.rr.com!
We hope to see you at our Brunswick and Cumberland Spring Open Houses this weekend. Lots to see, lots of savings, refreshments and Spring flowers! Open until 5 both Saturday and Sunday!
Thanks,
Mike Skillin
Spring Care of Perennials
Good gardening friend Paul Parent of the Paul Parent Garden Club (http://www.paulparent.com/) sends out a great newsletter every week with pertinent gardening topics. I encourage you to go to his website to sign up for his newsletter. Paul can also be heard every Sunday morning from 6 AM to 10 AM at his website or at WBACH (104.7 FM) every Sunday morning from 6 AM to 9 AM. Paul recently sent this article out called Spring Care of Perennials (I have added a few comments in italics) and here it is:
"The frost is out of the ground now and it is time for the gardens to begin to wake up and start growing. Here are a few tips for you to get your garden off to a good start. The first garden chore is to clean them of winter debris and any dead plant parts we left there from last fall. Cut to the ground all dead plant stems that remain in the garden. Pull all weeds, moss and grasses that survived the winter between plants. Think "Spring Cleaning for a Better Summer Garden." Once all cleaned, it is time to cut a new edge around the garden. Why?, you may ask-- because it will make the edge of the garden look better, it will be easier to mow the grass, and most important, the edge will keep the grass from your lawn out of the garden. Spreading grasses like common blue grass spread with underground rhizomes and stems; if you have an edge, the grass from the lawn is less likely to move into the garden.
A clean garden soil will warm up faster with the sun and that means earlier plant growth. Now sprinkle Preen granules or Corn Gluten evenly on the soil of the garden. This is a pre-emergence weed control; once the granular product dissolves with rain, it will form a skin or barrier on the soil preventing weeds from growing for the entire season. Think about that: no weeds to pull all summer long. Also, apply your garden fertilizer now and sprinkle evenly like you apply salt to an icy walk way during the winter. Use Plant Tone by Espoma or Plant Booster Plus by Organica.
If you see moss growing in the lawn you may want to lime the garden to counter the acidity. I love Jonathan Green Mag-I-Cal lime substitute, as one 40 pound bag will do the same as ten fifty pound bags of lime and it works in 2 weeks instead of 6 months. If the soil is wet or has standing water, spread the garden soil and lawn area with garden gypsum to improve drainage and prevent root rot. .
To help cut back on watering of the garden I always add 2 inches of compost over the weed preventer. If you do this now, you can just dump the compost right on top of the garden and rake it evenly over the entire garden. All the plants are dormant and raking will not hurt them. You can even walk on the garden and not hurt anything planted. If you wait until May to add mulch or compost, you will have to do this work by hand, so as not to damage newly sprouting plants emerging from the ground. Doing it now will save you many hours of labor later.
If you are planning to divide perennials, wait until they are just poking through the compost or mulch. It will be easier to divide plants properly when young, and without damaging the root system. Remember some plants are not ready until early May, so be patient. This is also the best time to move hybrid lilies, but dig deep as the bulb should be at least 6 inches deep in the ground. Do not add new plants to the garden until you are sure all existing plants are up and visible. If you have spring flowering bulbs, do not move them until they have finished flowering and the foliage has turned brown. That is usually 6 to 8 weeks after blooming.
Early sprouting perennial plants have a greater chance of rabbits and deer damage than later sprouting plants. Skillin's has a number of great deer repellents. I have found granular Milorganite spread around the garden every couple of weeks to be an excellent deterrent. Fresh green plants make a tasty meal for these animals and they're not "SHY" or "FUSSY", so get ready!"
Thursday, March 25, 2010
First Trip to the Garden Shed!
My first spring trip down to our garden shed every year should be as joyful as the sound of the song birds returning to our yard and gardens. In truth it’s more like cracking open a good Steven King novel, everything seems okay at first but the deeper you get into it you can be sure nothing good is to come of it. So with this truth in mind my dog and I headed down to the shed. I have peaked into the shed a couple of times during the winter and I remember even cracking the door open once to throw in some wayward tools I found still in the garden over the winter.
So here I stand--my dog and I--looking at the shed door. My dog is wagging her tail in the expectation of knowing that any moment when the door opens some furry critter is going to come charging out and the race will be on. I need to do the annual inventory of my Spring gardening supplies, check all my gardening implements and try to remember what was broken when I put it away (I am wondering if somehow maybe “the broken” is no longer broken, like that’s going to happen!) With both of our expectations firmly planted in our heads the door opens, everything looks peaceful and then the dog goes in. You know NASCAR has nothing on a Red Squirrel--fast off the line and red squirrels can easily weave in and out of traffic! Great, with her expectations met and out of my way I begin my evaluation of the chaos in front of me.
My tools are my first point of interest, I’ll need them soon so they have to be ready to use. “Shovel ready as they say!” There really is very little that can go wrong with shovels, rakes, edgers and hoes. Although after 35 years of gardening on my own I have broken a few handles and blades. It’s truly a shame but it seems almost impossible to find replacement handles for any of these tools anymore. But when you use these tools for what they were designed to do, broken handles usually are from their age and not their quality. When replacing tools I first make sure they feel good in my hands and the price does reflect the quality. You get what you pay for! Skillin’s offers the Radius Tool line and I am finding the Radius Tools to be top quality and easy to handle. They feel good in my hands. With digging tools in particular check the gauge or thickness of the steel, how the handles are put together and usually a cast tool lasts longer than a tool that has been stamped out like a Christmas Cookie (this another way of saying welded tool). However even those can last for years working in light soils. After inspection, my tools look to be ready for action, although I do have to sharpen with a file the edge on the shovel I use for dividing perennials. Too much sharpening can shorten a shovels life. However a relatively sharp edge is necessary for dividing perennials.

I garden almost exclusively with organic fertilizers and natural soil amendments. Unlike some of the synthetic garden solutions letting these organic products freeze is not a “deal breaker” however my bags of organic amendments have pretty much turned into a solid. Wicked smart of me--but like most guys I have done this before! I wrap the bags in and old piece of blue tarp and with a piece of 2X4 I have carefully crafted just for such an occasion I put on my safety glasses and break it up into it’s fine powder state once again. I really do try not to have “leftovers” in the Fall but it happens. With the knowledge from my University of Maine soil test I’ll work lime and fertilizer into our gardens. There are no pesticides in my shed, in general organic or not they really should not freeze. My garden plan for pesticides is to buy only the amount I need to complete the task. If I have to store pesticides I keep them where they can’t freeze and secured from my grandkids.
Now it’s the odds and ends like twine, I use twine all season long. I string it out along my beds so that I can edge out new straight edges, tie up my peppers, tomatoes, egg plants and various perennials when needed. Plant markers, a new blade for my #2 Felco hand pruners and gloves are needed-- I never seem to get more than a season out of gloves! Of course there will be more to my Spring garden needs over the next few weeks but this will get me and my dog going started--although she got we she came for!
Terry Skillin
Skillin's Greenhouses
March 25, 2010
So here I stand--my dog and I--looking at the shed door. My dog is wagging her tail in the expectation of knowing that any moment when the door opens some furry critter is going to come charging out and the race will be on. I need to do the annual inventory of my Spring gardening supplies, check all my gardening implements and try to remember what was broken when I put it away (I am wondering if somehow maybe “the broken” is no longer broken, like that’s going to happen!) With both of our expectations firmly planted in our heads the door opens, everything looks peaceful and then the dog goes in. You know NASCAR has nothing on a Red Squirrel--fast off the line and red squirrels can easily weave in and out of traffic! Great, with her expectations met and out of my way I begin my evaluation of the chaos in front of me.
My tools are my first point of interest, I’ll need them soon so they have to be ready to use. “Shovel ready as they say!” There really is very little that can go wrong with shovels, rakes, edgers and hoes. Although after 35 years of gardening on my own I have broken a few handles and blades. It’s truly a shame but it seems almost impossible to find replacement handles for any of these tools anymore. But when you use these tools for what they were designed to do, broken handles usually are from their age and not their quality. When replacing tools I first make sure they feel good in my hands and the price does reflect the quality. You get what you pay for! Skillin’s offers the Radius Tool line and I am finding the Radius Tools to be top quality and easy to handle. They feel good in my hands. With digging tools in particular check the gauge or thickness of the steel, how the handles are put together and usually a cast tool lasts longer than a tool that has been stamped out like a Christmas Cookie (this another way of saying welded tool). However even those can last for years working in light soils. After inspection, my tools look to be ready for action, although I do have to sharpen with a file the edge on the shovel I use for dividing perennials. Too much sharpening can shorten a shovels life. However a relatively sharp edge is necessary for dividing perennials.

(This is not Terry's shed but I thought a glimpse of summer beauty is never a bad thing. His shed does not look QUITE this good!)
I garden almost exclusively with organic fertilizers and natural soil amendments. Unlike some of the synthetic garden solutions letting these organic products freeze is not a “deal breaker” however my bags of organic amendments have pretty much turned into a solid. Wicked smart of me--but like most guys I have done this before! I wrap the bags in and old piece of blue tarp and with a piece of 2X4 I have carefully crafted just for such an occasion I put on my safety glasses and break it up into it’s fine powder state once again. I really do try not to have “leftovers” in the Fall but it happens. With the knowledge from my University of Maine soil test I’ll work lime and fertilizer into our gardens. There are no pesticides in my shed, in general organic or not they really should not freeze. My garden plan for pesticides is to buy only the amount I need to complete the task. If I have to store pesticides I keep them where they can’t freeze and secured from my grandkids.
Now it’s the odds and ends like twine, I use twine all season long. I string it out along my beds so that I can edge out new straight edges, tie up my peppers, tomatoes, egg plants and various perennials when needed. Plant markers, a new blade for my #2 Felco hand pruners and gloves are needed-- I never seem to get more than a season out of gloves! Of course there will be more to my Spring garden needs over the next few weeks but this will get me and my dog going started--although she got we she came for!
Terry Skillin
Skillin's Greenhouses
March 25, 2010
Falmouth Spring Open House 2010--Awesome!
Hello again,
Here are some great pictures from our Falmouth Open House 2010. Thanks to Rita of Skillin's Falmouth who took all these awesome pictures!
Please check out our Spring Open Houses this weekend, March 27 and March 28 at our Skillin's Brunswick and Cumberland locations! Email us at skillins@maine.rr.com with any questions!
 (Some very saucy Martha Washington geraniums)


Here are some great pictures from our Falmouth Open House 2010. Thanks to Rita of Skillin's Falmouth who took all these awesome pictures!
Please check out our Spring Open Houses this weekend, March 27 and March 28 at our Skillin's Brunswick and Cumberland locations! Email us at skillins@maine.rr.com with any questions!


(Sally designed and planted the 2010 John Skillin Garden--a wonderful memorial to a man who we are still so close to--thanks Sally!)

(A lush landscape!)

(The "goodies" are all important)

(Tim Bate in front of a flowering Kousa Dogwood)

(Mike with Sally, our manager, who managed and directed this great event!)

(Dave Skillin on hand and that is great!)

(One gorgeous gift shop--let me tell you!)

(Wow! This color can't be beat!)

(Johnny Roe saying thanks for coming!)
Mike Skillin
Skillin's Greenhouses
March 25, 2010
Tuesday, March 23, 2010
Garden Talks March 23-Pruning, Damping Off of Indoor Seedlings, Rhubarb, Tomatoes and Late Blight
Hello again,
Good friend Hammon Buck of Plants Unlimited sends out some very nice gardening information and this recent post came to my attention so I thought I would pass it on to you. This is extremely topical and VERY good advice for us gardeners in Skillin's Country. Plants Unlimited is a terrific garden center based in Rockport Maine. Hammon and I talk quite often and I always learn something about gardening and garden center business when we do speak. I hope he benefits some as well. Plants Unlimited is always worth a visit and they can be found at http://www.plants-unlimited.com/ and also at 629 Commercial Street (Route 1) in Rockport ME. Any comments I make are shown in italics:
"Prune many flowering shrubs and trees now while they are still dormant. Be aware that if certain varieties (forsythia, rhodys, lilacs and other spring flower plants) are pruned now, you might lose your spring flowers. The buds on plants are swelling and we prune now because they are full of energy and bounce back quickly. Also, it's so much easier to see the plants form without leaves obscuring your view. First, remove any dead branches or tips, then remove interior branches that cross through the plant - this "opens" the interior up for more light and air. Also remove branches that are rubbing together. Finally, you can prune to improve the symmetry of the tree by removing longer erratic branches. Use sharp pruners, loppers or saws as needed.
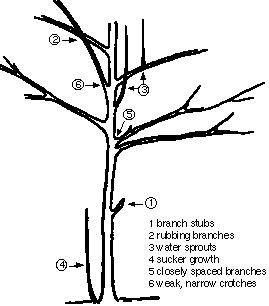
Larger branches on trees often require heavier duty tools than hand pruners. Folding saws, pole pruners or in extreme pruning, chain saws, might be needed. The branches should be cut close to the trunk (but not too close) and on an angle. Larger branches often require an undercut so that the weight of the falling branch does not rip away tree bark when it falls. Also, cut larger branches in sections to avoid weight damage."
Check out our pruning class this Saturday at 10 AM and 2 PM at Skillin's Falmouth! This will be a great class. Call us at 781-3860 for reservations OR contact us at skillins@maine.rr.com!

"It's a great time to prune rose bushes too, while they are still dormant. Remove any damaged or dead canes and crowded or crossed stems. Then, shorten undamaged canes in order to shape the plant. A good general tip for pruning most plants is to select buds that will grow outward (they are on the outside of the stem) and cut the branch slightly above this bud. This forces the plant to grow outward, avoiding growth toward the inside which only leads to rubbing branches and congested plant form. "

I think I had late blight on my tomatoes last year. Will it overwinter in my garden?
Tomatoes will not carry late blight over the winter, because freezing kills the whole plant.

Tomato seed, even from fruit that was infected with late blight, will not carry the pathogen, so no need to worry about the tomatoes left behind in the garden or compost pile.
What about my tomato stakes? Will it carry over on my tomato stakes?
No, late blight will not survive on tomato stakes and cages.
I grew potatoes last year. Can late blight overwinter on potatoes I may have left in the garden?
Potatoes that freeze or fully decompose will not carry the pathogen over winter. However, the biggest threat for overwintered disease in New England is on potatoes that might come up this year. In the spring, inspect last year’s potato plot and any compost or cull piles for volunteer potato plants. If you find potato plants, pull them out and put them in the trash or destroy them. If tubers were infected and survive, then the late blight pathogen could grow upward from the tuber, infecting the stem and producing spores when weather conditions are favorable. These spores could then disperse to other tomato and potato plants.
Is there anything else I can do to prevent late blight this year?
Yes. Late blight is not seedborne (however, it is tuber-borne in potato), so tomato plants started from seed locally (in the Northeast) will be free of the disease. Growing your own tomato transplants from seed or purchasing transplants that were started here in the Northeast from seed will ensure a healthy start to the season for you and local farms.
Also, purchase certified, disease-free seed potato from a reputable source. Seed potato grown in the Northeast is less likely to carry the disease. Examine your seed potatoes and plant only firm, blemish-free tubers.
I have spots on my tomato plants that show up in June or July every year. Could this be late blight?
Probably not. In addition to late blight, each year tomatoes become infected with early blight and Septoria leaf spot, which look very similar to late blight symptoms. If you have problems with early blight each year, consider growing tomato plant varieties that are resistant or tolerant to early blight. Also frequent early sprayings with a natural fungicide like Seranade or a disease preventer product like Vaccinate will help reduce the chances for early blight. Also feed your tomatoes with Tomato Tone by Espoma or liquid feed with Fish and Seaweed Food by Neptune's Harvest. These all natural foods contain good dosages of calcium which helps to prevent early blight, leaf spot and blossom end rot on tomatoes.
Mike Skillin
Skillin's Greenhouses
March 23, 2010
Good friend Hammon Buck of Plants Unlimited sends out some very nice gardening information and this recent post came to my attention so I thought I would pass it on to you. This is extremely topical and VERY good advice for us gardeners in Skillin's Country. Plants Unlimited is a terrific garden center based in Rockport Maine. Hammon and I talk quite often and I always learn something about gardening and garden center business when we do speak. I hope he benefits some as well. Plants Unlimited is always worth a visit and they can be found at http://www.plants-unlimited.com/ and also at 629 Commercial Street (Route 1) in Rockport ME. Any comments I make are shown in italics:
"Prune many flowering shrubs and trees now while they are still dormant. Be aware that if certain varieties (forsythia, rhodys, lilacs and other spring flower plants) are pruned now, you might lose your spring flowers. The buds on plants are swelling and we prune now because they are full of energy and bounce back quickly. Also, it's so much easier to see the plants form without leaves obscuring your view. First, remove any dead branches or tips, then remove interior branches that cross through the plant - this "opens" the interior up for more light and air. Also remove branches that are rubbing together. Finally, you can prune to improve the symmetry of the tree by removing longer erratic branches. Use sharp pruners, loppers or saws as needed.

Larger branches on trees often require heavier duty tools than hand pruners. Folding saws, pole pruners or in extreme pruning, chain saws, might be needed. The branches should be cut close to the trunk (but not too close) and on an angle. Larger branches often require an undercut so that the weight of the falling branch does not rip away tree bark when it falls. Also, cut larger branches in sections to avoid weight damage."
Check out our pruning class this Saturday at 10 AM and 2 PM at Skillin's Falmouth! This will be a great class. Call us at 781-3860 for reservations OR contact us at skillins@maine.rr.com!

"It's a great time to prune rose bushes too, while they are still dormant. Remove any damaged or dead canes and crowded or crossed stems. Then, shorten undamaged canes in order to shape the plant. A good general tip for pruning most plants is to select buds that will grow outward (they are on the outside of the stem) and cut the branch slightly above this bud. This forces the plant to grow outward, avoiding growth toward the inside which only leads to rubbing branches and congested plant form. "

Damping-off of indoor seedlings is a fungus disease that is the downfall of many folks who start their seedlings indoors. Damping-off is the single term used to describe underground, line, or crown rots of seedlings due to unknown causes. The term actually covers several soil borne diseases of plants and seed borne fungi. Damping-off can be prevented by using sterilized, well drained soil and containers with good drainage. Other preventative measures are avoiding overcrowding, over fertilization which cause plants to grow to quickly and too crowded and good air circulation. Do NOT allow your seedlings to become too moist and avoid watering late in the day or on cloudy days when water can't dry off the foliage quickly. Fungicides can be applied as a last resort, but will NOT be needed with good cultural practices. Other natural things you can do are apply milled sphagnum moss or cinnamon on the soil surface after seedlings are sown. Also mist the seedling once of twice a day with water containing either chamomile or clove tea."
"If your rhubarb has become thin and less productive, it's time to rejuvenate it. As soon as you see buds, dig up the plant clump and divide it. Replant these clumps with cow manure or any other high nitrogen fertilizer (I would actually plant the divided clumps with a good dose of Plant Tone by Espoma and then water several times with Neptune's Harvest Fish and Seaweed fertilizer). Continue to feed a few times through the summer with the fertilizer. Do not harvest any this year. This allows the plant to grow vigorously for next year. Generally, you should divide rhubarb every three years or so. "
Late blight caused by Phytophthora infestans – a very destructive and very infectious disease – killed tomato and potato plants in gardens and on commercial farms throughout the eastern U.S. during 2009. Late blight is the same disease that caused the Irish Potato Famine in the 1840s. While late blight occurs at some locations in the Northeast each year, the occurrence of late blight in 2009 was different compared to most seasons. In 2009 infected plants were distributed through large local retail stores throughout the region (Ohio to Maine) during June, and outbreaks were reported over this entire region by early July. Never before had such an extensive distribution of infected plants occurred, especially so early in the season. The early introduction combined with the abnormally cool, wet growing season as well as the exceptionally contagious nature of the disease during cool, rainy, windy weather resulted in a disastrous year for farmers and gardeners. The following are some frequently asked questions about this disease and what home gardeners can do to prevent problems this year.
I think I had late blight on my tomatoes last year. Will it overwinter in my garden?
Tomatoes will not carry late blight over the winter, because freezing kills the whole plant.

(tomato late blight)
Will seed from any tomatoes left in the garden last year carry over the disease?Tomato seed, even from fruit that was infected with late blight, will not carry the pathogen, so no need to worry about the tomatoes left behind in the garden or compost pile.
What about my tomato stakes? Will it carry over on my tomato stakes?
No, late blight will not survive on tomato stakes and cages.
I grew potatoes last year. Can late blight overwinter on potatoes I may have left in the garden?
Potatoes that freeze or fully decompose will not carry the pathogen over winter. However, the biggest threat for overwintered disease in New England is on potatoes that might come up this year. In the spring, inspect last year’s potato plot and any compost or cull piles for volunteer potato plants. If you find potato plants, pull them out and put them in the trash or destroy them. If tubers were infected and survive, then the late blight pathogen could grow upward from the tuber, infecting the stem and producing spores when weather conditions are favorable. These spores could then disperse to other tomato and potato plants.
Is there anything else I can do to prevent late blight this year?
Yes. Late blight is not seedborne (however, it is tuber-borne in potato), so tomato plants started from seed locally (in the Northeast) will be free of the disease. Growing your own tomato transplants from seed or purchasing transplants that were started here in the Northeast from seed will ensure a healthy start to the season for you and local farms.
Also, purchase certified, disease-free seed potato from a reputable source. Seed potato grown in the Northeast is less likely to carry the disease. Examine your seed potatoes and plant only firm, blemish-free tubers.
I have spots on my tomato plants that show up in June or July every year. Could this be late blight?
Probably not. In addition to late blight, each year tomatoes become infected with early blight and Septoria leaf spot, which look very similar to late blight symptoms. If you have problems with early blight each year, consider growing tomato plant varieties that are resistant or tolerant to early blight. Also frequent early sprayings with a natural fungicide like Seranade or a disease preventer product like Vaccinate will help reduce the chances for early blight. Also feed your tomatoes with Tomato Tone by Espoma or liquid feed with Fish and Seaweed Food by Neptune's Harvest. These all natural foods contain good dosages of calcium which helps to prevent early blight, leaf spot and blossom end rot on tomatoes.
Mike Skillin
Skillin's Greenhouses
March 23, 2010
Sunday, March 21, 2010
Winter Container Edibles
Hello again,
Melissa Madigan and Mary Mixer of Skillin's Falmouth spent some great time this winter starting, growing and harvesting FRESH vegetables and herbs in their homes. I have sampled some of what they produced and, wow, what a great taste!
Follows is a report by Melissa which will serve as the basis for her class on growing edibles in containers on Sunday March 21 at 2 PM at Skillin's Falmouth and Sunday March 28 at 11 AM at Skillin's Brunswick and 2 PM at Skillin's Cumberland.
Container / winter gardening is gaining in popularity due to the current economic climate. It is a great way to save money on your food bill and have the freshest vegetables all winter long!
If there is a sunny spot on a windowsill or in a room, then you can grow container vegetables and herbs.
Vegetable gardening indoors has most of the same requirements as an outdoor garden:
• bright light
• water
• nutrients
• protection from pests
Since space is likely to be limited, you do best to grow crops that mature quickly and be sure to stagger plantings in a couple of containers for a constant supply.
Setting Up Your Indoor Garden
1- Choose a space with plenty of sunlight, or an area where you can supplement with grow lights.
2- Get a planter that is appropriate size for what you are planting
3- Choose plants the will not grow too big or have extensive root systems
It is best to choose compact, miniature or dwarf varieties and crops that are quick to mature. Some good choices:
Herbal Teas - Spearmint, Peppermint,
Lemon Balm, Chamomile, Chocolate mint Herbs - Parsley, Oregano, Rosemary, Garlic, Thyme, Basil
Radishes Potatoes
Green onions Leafy Greens - spinach, lettuce, kale
Carrots Peas - Peas ‘N-A-Pot variety
Tomatoes - small varieties Celery - start it late summer and bring it in before frost
Peppers Bean Sprouts
Cauliflower Mushrooms
Planting:
Vegetables will grow in any container that provides good drainage, and is of appropriate size for what you are planting. The larger the plants root system the deeper and wider the container should be. Sow your seeds just as you would in your outdoor garden, thinning plants after the first leaves have gained strength.
Light:
Growing veggies indoors requires bright light just as they do outside - if you do not have enough light from a natural source you can supplement with a grow light or even bright fluorescent lights. Remember that plants tend to grow towards sunlight, so if possible it is a good idea to rotate your plants weekly so they will grow straight.
Temperature:
Most autumn and winter crops do well in temperatures of 60˚ - 65˚ daytime and 50˚ at night. Plants with warm roots can stand a room temperature 5-10˚ cooler - using a seed mat will help.
Good air circulation is very important for good plant health.
Water:
Water indoor crops when needed - but ONLY when needed! - too much water can result in fungus disease, and poor plant growth.
Water indoor crops in the AM on sunny days (if not using artificial light). Plants require less water in the winter - use room temperature to warm water.
Feeding:
Feed indoor container plants every other week with liquid fish, seaweed or organic liquid fertilizer. A folier spray of compost tea or liquid seaweed will aid in disease resistance. You should fertilize when the temperatures are cool.
Pests:
Give established indoor plants a rinsing under the faucet every 2 weeks to help prevent aphids, mites and white flies. You should spray the entire plant with lukewarm water, being sure to check the undersides.
Harvest:
Start snipping as soon as the plant is growing well - for example your lettuce leaves should be 2 - 2 1/2 high and your basil has at least 4 sets of leaves.
Containers:
Choose containers that have good drainage, and be sure that the plant pot is large enough to provide plenty of space for root growth, or in the case of a root vegetable, such as beets or carrots, room for them to grow.
Another good way to grow indoor winter crops would be to use a mini greenhouse. You can set it up in a small area (corner) of a room outfitting it with a grow light. You should have 4-5 shelves to place your plantings on, arranging them so that those plants that need the most light are on the upper shelves. You can place crops that can with stand cooler temperatures and less light on the bottom.
Using one of these greenhouses you can grow crops such as lettuce, peas in the pot, broccoli sprouts, spinach, celery, basil, micro greens and beets. In this set up the temperature was kept at a stable 60˚ and 68˚, after one week most plantings had started to show some growth as seen in these pictures. It was also discovered that plants that were already established (say you brought in from the garden just before frost), do extremely well under these conditions. If you are able to get veggie starts from your local greenhouse all the better, because even though the seeds will germinate and start to grow they have a hard time maturing unless they have some real sunlight and warmth (70-75 degrees).
Garden Talks March 21-Raking the lawn, Lawn spots, Let the soil dry! Uncover perennials
Good friend Hammon Buck of Plants Unlimited sends out some very nice gardening information and this recent post came to my attention so I thought I would pass it on to you. This is extremely topical and VERY good advice for us gardeners in Skillin's Country. Plants Unlimited is a terrific garden center based in Rockport Maine. Hammon and I talk quite often and I always learn something about gardening and garden center business when we do speak. I hope he benefits some as well. Plants Unlimited is always worth a visit and they can be found at http://www.plants-unlimited.com/ and also at 629 Commercial Street (Route 1) in Rockport ME. Any comments I make are shown in italics:
"Raking the lawn is a true test of how out of shape you are after the winter!
As soon as the snow has retreated and your lawn is dry, rake the old debris, sand, twigs and other foreign matter off. This will help remove thatch and debris that might restrain grass growth as well as aerate the lawn. Air and light will also trigger lush growth. All of this helps to get your lawn greening and growing.
Wait until the grass is dry – not spongy. Working on lawns that are too wet compacts the soil, reducing the air in the soil – not the effect you are striving for!" Folks we are getting to that point in many sunny well drained areas of the yard, but maybe not so in wet, darker areas. So, choose your spots carefully. BUT I am a firm believer in giving your lawn a good thorough raking each Spring. A good vigorous raking helps so much when it comes to pullling out dead and unproductive material and letting sun and air into the soil area of your lawn!
"Examine any dead patches that might be in your lawn. If they are round, (almost a perfect circle) and pale yellow edged in pink, you probably have snow mold. This is a grayish, stringy fungus that lives under the snow. You may have to treat this with a fungicide but a good hard raking and aeration will usually be sufficient to control this fungus.
Dead areas on a lawn are not always snow mold. There should be less damage of lawns this spring since there was not much snow and ice packed on lawns this season. Most of this is NOT fungus - but rather only winter damage that should come back with raking and aeration.. "
Yes, you're eager to get into your garden but make sure the soil has adequately dried before you try to do too much. Avoid walking on partially frozen or wet ares because the compaction from your weight is damaging to the soil structure. If you must get out, lay down some planks to walk on. These will help distribute your weight and lessen compaction. Nothing beats a few good windy and sunny March days to dry out the garden."
This advice about letting the soil dry is pretty important. Working in or walking on a wet garden will severely compact the soil of your garden and this compaction can cause the soil to clump and stick together. This really keeps light and air that is essential for a healthy soil to process nutrients and break down organic matter. Be patient! Don't work in a boggy garden space!
"Groom any perennials now as the snow recedes. Cut back any stems you missed last fall to within a few inches of the soil line. Remove any debris from around them like leaves and stems. The plants will have fewer obstacles as they appear in the spring." Yes, keep pulling the mulch off the plants. I have a couple of areas of particularly new plantings from last year that I am going to keep covered for another week or two but other more established areas are going to get uncovered very soon. Many of you have probably already done this!
If you left your ornamental grasses standing last fall to create winter interest, the beauty is probably gone now! Snow has probably flattened them and made them quite unsightly. When you can finally get to these grasses, cut them down to within an inch or two of the soil line. This will help make way for new growth this spring!"
Mike Skillin
Skillin's Greenhouses
March 21, 2010
The White Pine
Good gardening friend Paul Parent of the Paul Parent Garden Club (http://www.paulparent.com////) sends out a great newsletter every week with pertinent gardening topics. I encourage you to go to his website to sign up for his newsletter. Paul can also be heard every Sunday morning from 6 AM to 10 AM at his website or at WBACH (104.7 FM) every Sunday morning from 6 AM to 9 AM. Paul recently sent this article out The White Pine and here it is:
"Many of us know that the strongest wood available from our native forest is the oak family of trees. The value of the wood from these trees was almost that of gold at one time during the 1700's. The king of the trees was the white pine and it was so valuable that this tree was one of the reasons we fought the War of Independence in 1776. In 1761, the British government passed a law in England that all white pines growing in the colonies that had growth 24 inches diameter and upwards at 12 inches from the earth belonged to the Royal Navy. No such tree, they said, "shall be cut without a license" from the Kingdom of Great Britain.
In 1774 The American Congress passed a law stopping the export of all white pine trees from its shores. In 1775 the lumbermen from Machias, Maine overtook the armed British Warship "Margaretta" and turned her into a privateer against the British. The same year the patriots of Portsmouth, New Hampshire seized the British storage yards where hundreds of tall white pine logs were ready for shipment to England for ship's masts. In 1777, John Paul Jones used those same logs to build a mast for the "Ranger," our first warship, and it flew the "Stars and Stripes."
And you thought it was just a tree! Well, as just a tree, it is the finest evergreen tree you can plant on your property. If the white pine is not disturbed it will grow for up to 400 years. The white pine is the tallest growing tree native to eastern North America, and is the state tree of Maine and Michigan.
White pines are easily transplanted because of a wide spider web like root system that grows shallow in the soil. It will thrive in a well-drained sandy soil, but if you plant it in a rich moist soil in a sunny location this tree will have no match for its looks. When the tree is young, it will have a pyramidal shape and hold green foliage right to the ground, making a great screen plant. As it matures, the tree opens up and spreads out, often with a flat top, and the branches become irregularly shaped. Most white pines grow from a single trunk and seldom need pruning. Plant them in groups and they will protect you from the wind and muffle the noise on the other side of the planting. Once the pine grows to 25 to 30 feet tall, it will provide you with a beautiful living area under the branches as they mature.
White pines will grow 1 to 3 feet a year when established and mature to 50 to 80 feet tall and 20 to 50 feet wide. The needles are soft to the touch and grow to 4 to 5 inches long. The needle color will range from medium green to blue green and they develop in a bunch of five. Each needle cluster will stay on the tree for a year and a half before falling from the tree. The ground will have a thick blanket-like covering under the tree of brown needles, often choking out the weeds. The soil is traditionally acid for the best growth so keep the limestone away from this plant. When young, fertilize spring and fall until the trees reach 10 feet tall. Use an acid-based tree food such as Holly-Tone or Acid Adoring.
Plant the white pine as specimen plant on the front lawn and prune it to keep the pyramidal shape. This tree will make a wonderful plant when used in groups for screening or hedges for privacy. White pine will not do well when planted on the side of the road as it will suffer from road salt, air pollution, ozone and sulfur dioxide damage. It will not do well in a clay type soil or areas with standing water. If you park your car under the tree you will compact the soil and hurt the tree roots, so stay off! The tree will get back to you by dripping "pitch" on your car and remove the paint. Enjoy."
The Beach Rose
Good gardening friend Paul Parent of the Paul Parent Garden Club (http://www.paulparent.com///) sends out a great newsletter every week with pertinent gardening topics. I encourage you to go to his website to sign up for his newsletter. Paul can also be heard every Sunday morning from 6 AM to 10 AM at his website or at WBACH (104.7 FM) every Sunday morning from 6 AM to 9 AM. Paul recently sent this article out The Beach Rose and here it is:
"The best known and most loved type of rose in the family of roses is the beach rose. The Rosa Rugosa has it all, including a "FRAGRANT" flower that is hard to find today in the rose garden. As the flower fades, a one inch diameter orange red tomato-like fruit develops at the base of the stem where the flower once was. The fruit will color up in late July to early August and last well into the fall. You can eat the fleshy part of the rose fruit, as it is rich in vitamin E.

The Rosa Rugosa is a shrub rose and, unlike the typical rose bush you plant in the garden, has its own root system. The typical rose bush is grafted to a different root system, to make it strong enough to survive the winter where you live. Because the beach rose has its own roots, it is able to spread with underground stems that form from those roots to start new plants away from the main plant.
The beach rose has rough-looking deep green leaves that are shiny, with rounded teeth on the edge of the leaf margin. Each leaf is thick and will have from 3 to 7 individual leaflets making up the leaf. Older leaves have higher leaflet count and the leaf just below the flower always has 3 leaflets. The veins on the leaf are sunken into the foliage and very noticeable. The plant develops into a rounded mound of stems, and each of those stems is covered with flowers in June. You can grow the plant as a single mound-type rose bush if you remove the suckering branches that develop continuously around the plant.
The flowers are 2 to 3.5" in diameter and mostly single blossoms. Single flowering types have a single row of petals that are flat and number 5 petals--like a rosette. Today you can find new hybrids that are double-flowering and often resemble a carnation bloom. The flower color will range through white, pink, red and mauve. The center of the flower is filled with many yellow stamens, giving it additional color. Each flower will bloom for 2 weeks or more on the plant. If you cut a fresh bloom just opening and place it in a bowl or brandy snifter filled with water, it will float easily and bring fragrance to your kitchen table. It will last several days.
The Rosa Rugosa will grow 4 to 6 feet tall but with pruning you can keep it at any height you want. When planted on 3 foot centers in a row, they will make a wonderful hedge planting. Make the planting bed 3 feed wide to allow room for the new shoots to develop and in just 2 to 3 years your individual plants will fill in the entire bed with new shoots, creating a solid hedge. Your only maintenance will be removing the shoots that develop in the lawn area from the hedge. Cover the bed with 2 to 3 inches of compost or bark mulch to keep the weeds out.
Rosa Rugosa, or beach rose, will grow "ANYWHERE," even at the beach in the sand. If you have a sunny, well drained place in your yard that where nothing seems to grow, think about planting a beach rose. When planting, use the same method as any other plant in your garden by conditioning the hole and surrounding soil with animal manure and compost to get the plant off to a good start. I always use a soil conditioner like Soil Moist in sandy soil to help hold moisture around the roots. Soil Moist will hold 200 times the moisture in the soil that peat will, and only a couple of tablespoons are needed per plant. Think about this, two tablespoons of Soil Moist will hold 400 tablespoons of water around the roots of a plant that is growing in a sandy soil. Less watering is necessary, and once it is established it can take care of itself. Fertilize in the spring and again in June with granular organic rose fertilizer and enjoy a garden of roses all summer long. One last thing about this rose is disease resistance, unlike most other roses. Enjoy!"
Wednesday, March 17, 2010
The Constant Gardener
KCB is a professional gardener and friend who does wonderful work in the Greater Portland area. KCB is also an accredited Master Gardener by the Cooperative Extension Service and we are honored to have KCB as part of our Skillin's Garden Log family. KCB can also be found at the awesome Finishing Touches website.
This past February I began my 3rd year of writing for the Skillin’s Gardening Log. Those who read the postings on a frequent basis at times learned more about me than gardening. You’ve offered condolences at my surrendering a dog, felt the pain of The NE Patriots Super Bowl loss. Witnessed me moving away from the hill and back again. I have discussed relationships and even revealed the trials and tribulations of dating.
Not sure if I ever divulged that I once had a successful ‘corporate’ career, remain good friends with my former husband (I don’t like the term ex), sold a house I loved. There have been 3 occasions when I lovingly held a beautiful Golden Retriever as they peacefully drifted from this life. To this day my eyes fill and a sob catches in my throat when I recall the love of those dogs.
These events did not take place over a life time but in a span of 11 years! We have entered 2 decades since. Additionally, is it possible over 10 years has passed since we were celebrating Y2K? Many changes, most for better, others are still waiting for the verdict. Through all this I have had one constant, my truck.
Some of you may have seen it. A bright light blue pick-up truck, extended cab and a bed cap. Originally its purchase was a compromise. My Saab was getting old and SUVs were all the rage. My husband wanted a pick-up truck. We needed to make some changes to our landscape and a pick-up meant we could fill the bed w/mulch and loam, purchase shrubs and cash and carry the antiques and vintage furniture we were starting to collect.
To me a pick-up meant no place for our current Golden, Roxy. Where to put the groceries? This would be the vehicle I would drive as my Saab was the sacrifice. We settled on a 2 year-old GMC with a cap and extended cab. The cap could be removed for large hauls, a dog bed would add softness for my canine when the cap was on and behind the seats was more than enough room for groceries and a 4-legged companion during the cap less days of summer. The color was a little too bright yet years later it served as a signature. My truck was recognized everywhere. I would accessorize my truck with special vanity plates, DRUID.
This truck sat for hours in the parking lot of my former employer, been spotted in many driveways since my career change, even enlisted a client or two once I cloaked the doors with a magnetic sign. The steering wheel once felt the hands sporting a perfect French manicure. Feet wearing high heels pumped the pedals. Somehow I knew the truck was happier with a gardener at the helm. Weren’t trucks meant to work and not just look pretty?
Work that truck I did. The cap no longer was put in storage for the summer; the back was filled with well used tools, often filled to the gills with plants, shrubs, bags of compost. I left the bulk deliveries to the big boys.
As an escape I would often take long power rides. Happy Golden by my side. I devoured many audio books while driving. The truck assisted in one of the most heart breaking moves, followed by a celebratory move when dear friends were buying their dream house a few days after I sold mine.
Around town I often am greeted by an arm waving from the driver’s window as my truck is spied long before I notice the approaching vehicle.
For the past 2 of my truck’s 13 years it has been feeling the pangs of age which resulted in a pain in my wallet. The last 4 months has been a series of life support fixes until neither my finances nor my mechanic wanted to go any further.
Blessedly a friend offered to take it off my hands and offered me cash to boot. He is partial to GMCs and felt he could resurrect my baby blue druid to a working state.
It was surreal as I watched my truck back out from my driveway for the last time.
My next pick-up will not be bright blue nor don the druid plate. Like my truck, it is time to let go. The one that has been offered to me is older than the truck I said good-bye to. I have known this person since I was 18, which admittedly is more than a decade or two ago. He has witnessed more changes in my life than any other has. We call each other on birthdays and Christmas.
As a collector and repairer of autos I called one day to see if he knew of an available truck. He had a car or 2 available but a truck is what I must have. ‘Don’t tell me you are still doing that garden thing?’ he asked. An adamant ‘yes’ was my reply. This was met with his laughing, ‘glad some things haven’t changed’.
It has been said the only thing we can count on is that things will change. So be it.
I face a new season; look forward to my returning clients, feel sadness at those who have reason to no longer seek my services, will embrace the new coming aboard for the first time and hope to welcome a few additions. With all I have to look forward to I know one thing for sure, gardening is the one aspect of my life that is constant. Moreover, who among gardeners doesn’t know change? Let us all be constant gardeners…
KCB for Skillin's Greenhouses
March 17, 2010
Tuesday, March 16, 2010
Caring for Fruit Trees
Good gardening friend Paul Parent of the Paul Parent Garden Club (http://www.paulparent.com//) sends out a great newsletter every week with pertinent gardening topics. I encourage you to go to his website to sign up for his newsletter. Paul can also be heard every Sunday morning from 6 AM to 10 AM at his website or at WBACH (104.7 FM) every Sunday morning from 6 AM to 9 AM.

It does not matter what type of fruit tree you plant; just follow these steps and all types of fruits will provide you with a nice crop of fresh fruit in the late summer to late fall. Begin by selecting a location with full sunshine. This location should be sheltered from the wind when possible and warm during the day. Try to avoid frost pockets and, when possible, plant on the side of a hill rather than at the bottom of a hill, because cold always slides down the hill and collects at the bottom. This is most important in the early spring when the fruit trees are in bloom, as a frosty morning could kill all your flowers and no fruit will form.
All fruit trees prefer a soil that is well drained and rich in organic matter. When planting fruit trees, be sure to add plenty of compost to help get them off to a great start. A slightly acidic soil is preferred; pH 6.0 to 6.5 is recommended. In a wet location on flat ground, the tree will struggle. If you have a clay-type soil plant something else, because your trees will never do well. Newly planted fruit trees must be watered regularly during the first year, and I recommend it be twice a week, 5 to 10 gallons each time. If the summer gets hot and dry, water more!
Fertilizing in the spring is best--before the foliage appears on the tree--with an organic slow release fertilizer such as Tree-Tone, Milorganite or Dr Earth Fruit Tree Food. Lime is necessary when you see moss growing on the ground around the trees. No moss growing--no lime needed. Mulch piled around the base of the tree will help the tree in many ways. Mulch or compost should be 2 to 3 inches deep and 3 to 4 feet wide around the tree. This will keep the weeds away, keep the soil cooler during the summer and hold surface water longer around the tree during the summer. This planting bed also prevents YOU from hitting the trunk of the tree with the lawn mower or weed whacker when maintaining the yard. Compost around the base will slowly feed the young roots every time it rains, to encourage a good root development and a better tree. ( I really recommend compost around the tree for the slow breakdown of good organic matter!--Mike Skillin)
At the time you plant your fruit trees, use a single stake driven into the ground to support the tree for the first couple of years and tie down the tree with wire and a hose sleeve to prevent damage to the tree. This will help create a straight growing tree. Wrap the trunk of the tree with a circular ring of hardware cloth wire to protect the bark of the tree for the first 5 years from mice and rabbits. The wire ring should be 3 inches away from the trunk of the tree and pushed into the soil 2 inches deep. The height of the wire should be 24 inches. (Remember to remove the supports before the tree grows into them!)
In February or March, prune your tree to control size and create a better shape on the tree. When the outdoor temperature is above 40 degrees, spray your fruit trees with dormant or horticultural oil to kill eggs laid on the tree last fall by insects. This will really help with insect problems during the year. Also spray your trees with Liquid Copper Fungicide to help eliminate disease spores left on the plant last fall. These two sprayings should always be done before the foliage develops on the tree. When the tree is in bloom, "DO NOTHING" to the tree or you could cause all the flowers to drop, resulting in no fruiting on the tree. Once the flowers fall from the fruit tree, develop an every-other-week spraying program to control disease and insect problems. For organic control use Organocide fruit tree spray from Organic Labs, or the new liquid Fruit Tree Spray from Bonide Lawn and Garden. Do this until 2 weeks before harvest."

"The most grown fruit tree is the apple! Apples are believed to have originated in the mountains of Kazakhstan in central Asia. Pears, plums, peaches, and cherries are also popular but the apple has one characteristic the others do not have: the ability to be stored during the winter. Apples can be eaten when ripe in September and October but, when stored properly, will last well into the winter months. Not long ago, when fresh fruit was nearly impossible to find during the winter months, apples were king. Today, with modern shipping, any fruit is available at anytime of the year from around the world. But for the home gardener, this is still the best fruit for ease of winter storage.
It does not matter what type of fruit tree you plant; just follow these steps and all types of fruits will provide you with a nice crop of fresh fruit in the late summer to late fall. Begin by selecting a location with full sunshine. This location should be sheltered from the wind when possible and warm during the day. Try to avoid frost pockets and, when possible, plant on the side of a hill rather than at the bottom of a hill, because cold always slides down the hill and collects at the bottom. This is most important in the early spring when the fruit trees are in bloom, as a frosty morning could kill all your flowers and no fruit will form.
All fruit trees prefer a soil that is well drained and rich in organic matter. When planting fruit trees, be sure to add plenty of compost to help get them off to a great start. A slightly acidic soil is preferred; pH 6.0 to 6.5 is recommended. In a wet location on flat ground, the tree will struggle. If you have a clay-type soil plant something else, because your trees will never do well. Newly planted fruit trees must be watered regularly during the first year, and I recommend it be twice a week, 5 to 10 gallons each time. If the summer gets hot and dry, water more!
Fertilizing in the spring is best--before the foliage appears on the tree--with an organic slow release fertilizer such as Tree-Tone, Milorganite or Dr Earth Fruit Tree Food. Lime is necessary when you see moss growing on the ground around the trees. No moss growing--no lime needed. Mulch piled around the base of the tree will help the tree in many ways. Mulch or compost should be 2 to 3 inches deep and 3 to 4 feet wide around the tree. This will keep the weeds away, keep the soil cooler during the summer and hold surface water longer around the tree during the summer. This planting bed also prevents YOU from hitting the trunk of the tree with the lawn mower or weed whacker when maintaining the yard. Compost around the base will slowly feed the young roots every time it rains, to encourage a good root development and a better tree. ( I really recommend compost around the tree for the slow breakdown of good organic matter!--Mike Skillin)
At the time you plant your fruit trees, use a single stake driven into the ground to support the tree for the first couple of years and tie down the tree with wire and a hose sleeve to prevent damage to the tree. This will help create a straight growing tree. Wrap the trunk of the tree with a circular ring of hardware cloth wire to protect the bark of the tree for the first 5 years from mice and rabbits. The wire ring should be 3 inches away from the trunk of the tree and pushed into the soil 2 inches deep. The height of the wire should be 24 inches. (Remember to remove the supports before the tree grows into them!)
In February or March, prune your tree to control size and create a better shape on the tree. When the outdoor temperature is above 40 degrees, spray your fruit trees with dormant or horticultural oil to kill eggs laid on the tree last fall by insects. This will really help with insect problems during the year. Also spray your trees with Liquid Copper Fungicide to help eliminate disease spores left on the plant last fall. These two sprayings should always be done before the foliage develops on the tree. When the tree is in bloom, "DO NOTHING" to the tree or you could cause all the flowers to drop, resulting in no fruiting on the tree. Once the flowers fall from the fruit tree, develop an every-other-week spraying program to control disease and insect problems. For organic control use Organocide fruit tree spray from Organic Labs, or the new liquid Fruit Tree Spray from Bonide Lawn and Garden. Do this until 2 weeks before harvest."
Subscribe to:
Posts (Atom)